First of all set the “yourvagranthostname” in host /etc/hosts, with the the private network ip address that just configured below
192.168.61.84 yourvagranthostname
download centos box file from http://www.vagrantbox.es/
$vagrant box add mylovelybox ~/path-to-box-file/file.box
==> box: Box file was not detected as metadata. Adding it directly...
==> box: Adding box mylovelybox (v0) for provider:
    box: Unpacking necessary files from: file:///Users/MyMac/vagrant_box/CentOS-Ruby.box
$vagrant box list
mylovelybox (virtualbox, 0)
mytrusty  (virtualbox, 0)
$mkdir myproject
$cd myproject
$vagrant init mylovelybox
A Vagrantfile has been placed in this directory. You are now
ready to vagrant up` your first virtual environment! Please read
the comments in the Vagrantfile as well as documentation on
vagrantup.com for more information on using Vagrant.
$vim Vagrantfile
edit your Vagrantfile to this
Vagrant.configure(2) do |config|
   config.vm.box = "mylovelybox"
   config.vm.network "forwarded_port", guest: 3000, host: 3000
   #choose random or as your wish ip address for the prvate network
   config.vm.network "private_network", ip: "192.168.61.84"
   config.vm.synced_folder "./your-rails-app-project", "/vagrant"
end
run your vagrant
$vagrant up
Bringing machine 'mylovelybox' up with 'virtualbox' provider...
==> default: Importing base box 'mylovelybox'...
==> default: Matching MAC address for NAT networking...
==> default: Setting the name of the VM: centos_default_1459837818513_44045
==> default: Clearing any previously set network interfaces...
==> default: Preparing network interfaces based on configuration...
    default: Adapter 1: nat
==> default: Forwarding ports...
    default: 22 (guest) => 2222 (host) (adapter 1)
==> default: Booting VM...
There was an error while executing `VBoxManage`, a CLI used by Vagrant
for controlling VirtualBox. The command and stderr is shown below.

Command: ["startvm", "7b5094ad-75e4-4e75-9100-794569c929c7", "--type", "headless"]

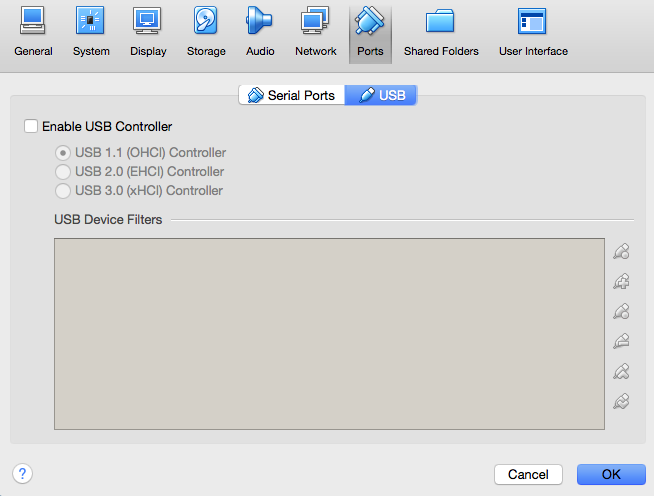
Stderr: VBoxManage: error: Implementation of the USB 2.0 controller not found!
VBoxManage: error: Because the USB 2.0 controller state is part of the saved VM state, the VM cannot be started. To fix this problem, either install the 'Oracle VM VirtualBox Extension Pack' or disable USB 2.0 support in the VM settings.
VBoxManage: error: Note! This error could also mean that an incompatible version of the 'Oracle VM VirtualBox Extension Pack' is installed (VERR_NOT_FOUND)
VBoxManage: error: Details: code NS_ERROR_FAILURE (0x80004005), component ConsoleWrap, interface IConsole
oops i think, i forgot something. i should configure my virtualbox first
do this so the error will resolved. disable usb!

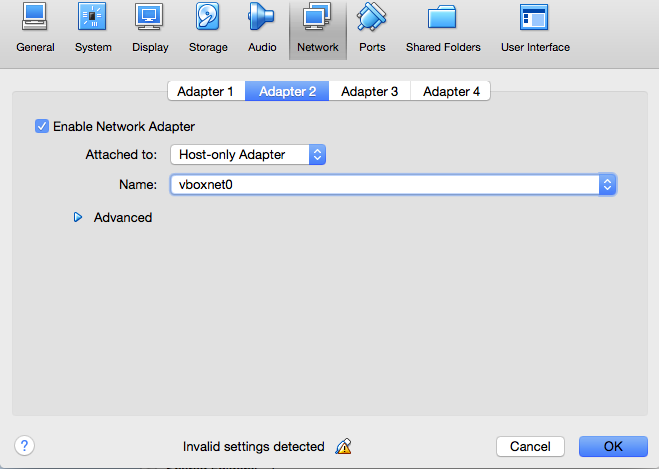
and dont forget to create host-only network adapter on virtualbox, so we can use our private network that just configured above

try run vagrant again
$vagrant up
Bringing machine 'mylovelybox' up with 'virtualbox' provider...
==> default: Clearing any previously set network interfaces...
==> default: Preparing network interfaces based on configuration...
    default: Adapter 1: nat
    default: Adapter 2: hostonly
==> default: Forwarding ports...
    default: 22 (guest) => 2222 (host) (adapter 1)
==> default: Booting VM...
==> default: Waiting for machine to boot. This may take a few minutes...
    default: SSH address: 127.0.0.1:2222
    default: SSH username: vagrant
    default: SSH auth method: private key
    default:
    default: Vagrant insecure key detected. Vagrant will automatically replace
    default: this with a newly generated keypair for better security.
    default:
    default: Inserting generated public key within guest...
    default: Removing insecure key from the guest if its present...
    default: Key inserted! Disconnecting and reconnecting using new SSH key...
==> default: Machine booted and ready!
==> default: Checking for guest additions in VM...
    default: The guest additions on this VM do not match the installed version of
    default: VirtualBox! In most cases this is fine, but in rare cases it can
    default: prevent things such as shared folders from working properly. If you see
    default: shared folder errors, please make sure the guest additions within the
    default: virtual machine match the version of VirtualBox you have installed on
    default: your host and reload your VM.
    default:
    default: Guest Additions Version: 4.3.20
    default: VirtualBox Version: 5.0
==> default: Mounting shared folders...
    default: /vagrant => /Users/MyMac/your-rails-app-project
$vagrant ssh
Last login: Tue Feb  3 14:01:07 2015
-bash: warning: setlocale: LC_CTYPE: cannot change locale (UTF-8): No such file or directory
$ip addr
...
3: enp0s8: <BROADCAST,MULTICAST,UP,LOWER_UP> mtu 1500 qdisc pfifo_fast state UP qlen 1000
    link/ether 08:00:27:35:c4:d5 brd ff:ff:ff:ff:ff:ff
    inet 192.168.61.84/24 brd 192.168.61.255 scope global enp0s8
       valid_lft forever preferred_lft forever
    inet6 fe80::a00:27ff:fe35:c4d5/64 scope link
       valid_lft forever preferred_lft forever
now i am officially in a box. now set the host name. append this to /etc/hosts
127.0.0.1 yourvagranthostname
because i want to run my thin ruby webserver in nginx server block ( virtual host ) so i should edit the configuration in /etc/nginx/conf.d/whateveryourconfigfile.conf
server {
  listen       80;
  server_name  yourvagranthostname;
  location / {
          proxy_pass http://0.0.0.0:3000;
          proxy_set_header Host $host;
          proxy_set_header X-Real-IP $remote_addr;
          proxy_set_header X-Forwarded-For $proxy_add_x_forwarded_for;
          proxy_set_header X-Forwarded-Proto $scheme;
  }
}
add new directory called “pids” on your rails project directory
$cd /vagrant
$mkdir -p tmp/pids
now create development.yml in config/thin directory
---
chdir: "/vagrant"
environment: development
address: 0.0.0.0
port: 3000
timeout: 30
log: "/etc/nginx/conf.d/log/thin.log"
pid: tmp/pids/thin.pid
max_conns: 1024
max_persistent_conns: 100
require: []
wait: 30
threadpool_size: 20
servers: 1
daemonize: true
then invoke thin. and check it with ps
$thin -e development -C config/thin/development.yml start
Starting server on 0.0.0.0:3000 ...
$ps -ax | grep thin
 6157 ?        Sl     0:08 thin server (0.0.0.0:3000)
 6170 pts/0    R+     0:00 grep --color=auto thin
Test the nginx configuration and reload my nginx server, dont forget to make sure nginx are run on background
$sudo nginx -t
nginx: the configuration file /etc/nginx/nginx.conf syntax is ok
nginx: configuration file /etc/nginx/nginx.conf test is successful
$sudo nginx -s stop && sudo nginx -s reload && sudo nginx
$ps -ax | grep nginx
 6262 ?        Ss     0:00 nginx: master process nginx
 6263 ?        S      0:00 nginx: worker process
then call the hostname in browser http://yourvagranthostname/

